SurgeryWeb Support Centre
Customise your website
The Customise your website section allows you to manage your practice details, website features, colours and important messages displayed to visitors.
How to access Customise your website
- Log in to your website dashboard.
- From the left-hand menu, click Customise your website.
- Select the section you wish to manage.
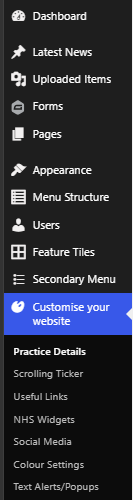
The following options are available:
- Practice Details
- Scrolling Ticker
- Useful Links
- NHS Widgets
- Social Media
- Colour Settings
- Text Alerts/Popups
Practice Details
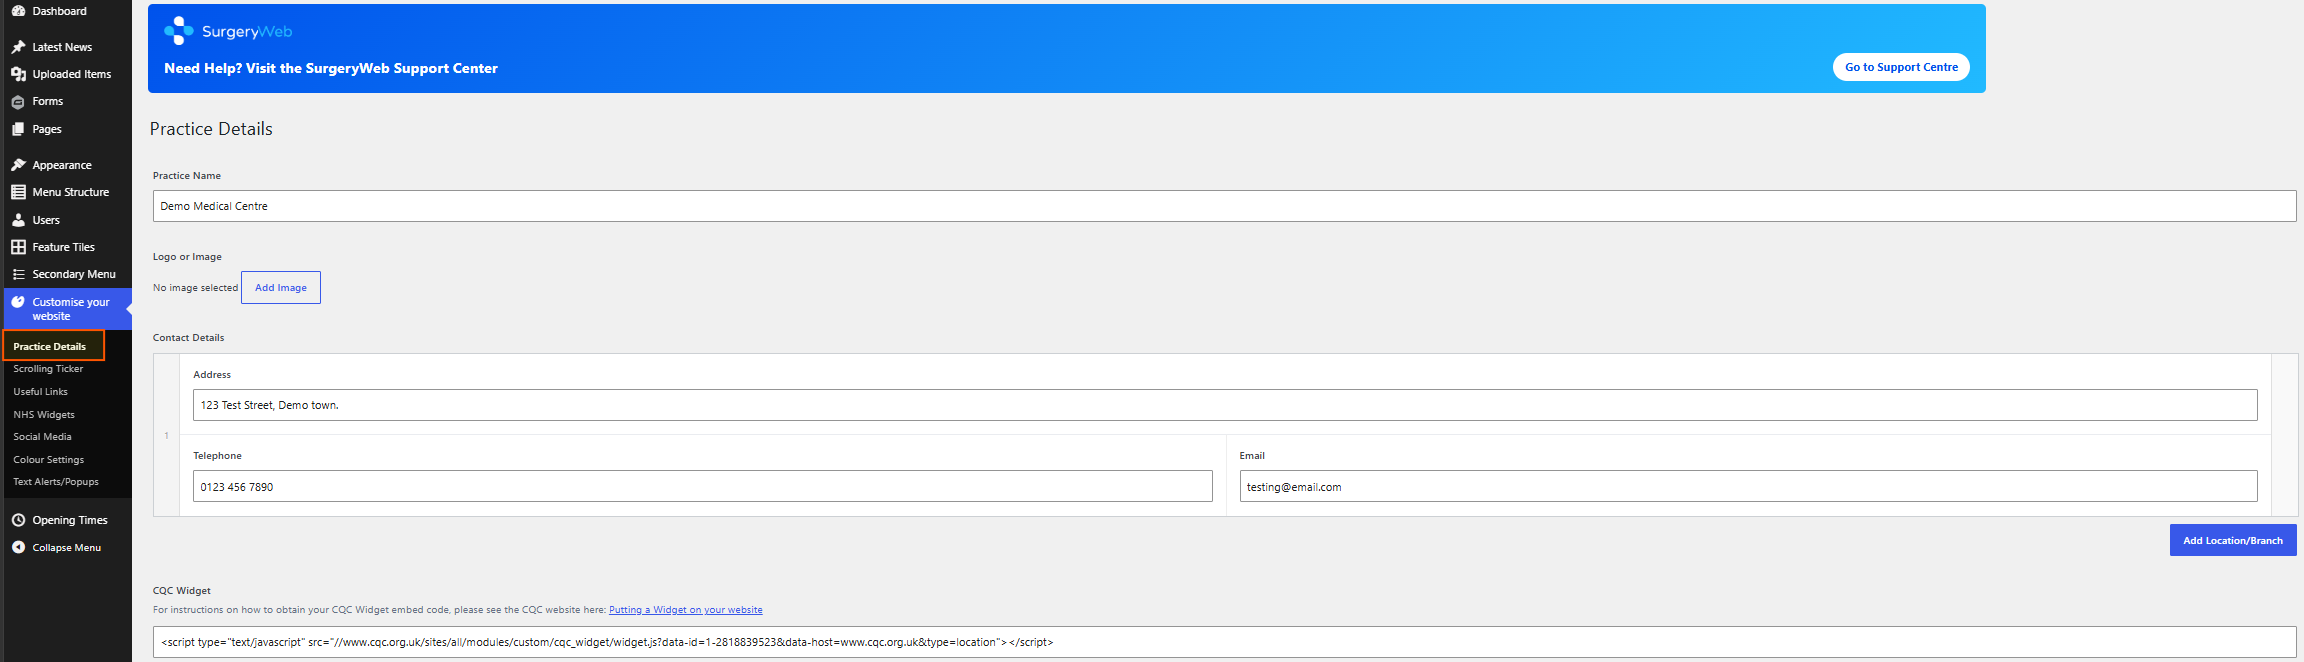
The Practice Details section allows you to update your practice name, logo, contact information and branch details.
Update your practice information
- Go to Customise your website → Practice Details.
- Update the Practice Name field if required.
- Under Logo or Image, click Add Image to select or upload your practice logo.
- Under Contact Details, review and update:
- Address – Your practice address.
- Telephone – Your practice telephone number.
- Email – Your practice email address.
- To add another practice location, click Add Location/Branch and enter the additional contact details.
CQC Widget
- Locate the CQC Widget field.
- Enter the embed code provided by the Care Quality Commission (CQC).
- Follow the guidance on the page if you need help obtaining your CQC Widget code.
- Click Update to save your changes.
Check your live website to ensure the updated information displays correctly.
Scrolling Ticker
The Scrolling Ticker displays scrolling information beneath your website’s main navigation menu.
You can use it to display your latest news headlines or a custom message.
Enable the Scrolling Ticker
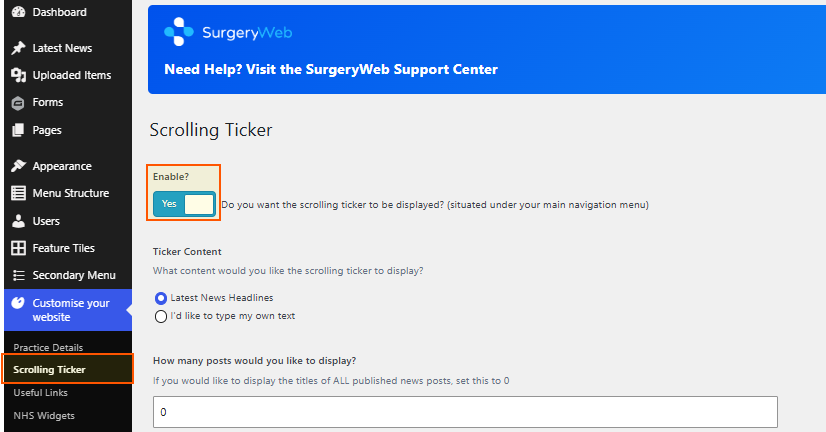
- Go to Customise your website → Scrolling Ticker.
- Under Enable?, select Yes to display the ticker.
- Under Ticker Content, choose one of the available options:
- Latest News Headlines – Displays headlines from your published news posts.
- I’d like to type my own text – Allows you to enter a custom scrolling message.
Display Latest News Headlines
- Select Latest News Headlines.
- Under How many posts would you like to display?, enter the number of news posts you want to show.
- Enter 0 to display the titles of all published news posts.
- Click Update to save your changes.
Display your own text
- Select I’d like to type my own text.
- Enter the message you wish to display in the available text field.
- Click Update to save your changes.
Check your live website to ensure the scrolling ticker displays correctly.
To disable the scrolling ticker, change Enable? to No and click Update.
Useful Links
The Useful Links section allows you to manage links to external websites and services that may be helpful to patients.
Each link includes a title, image and website address.
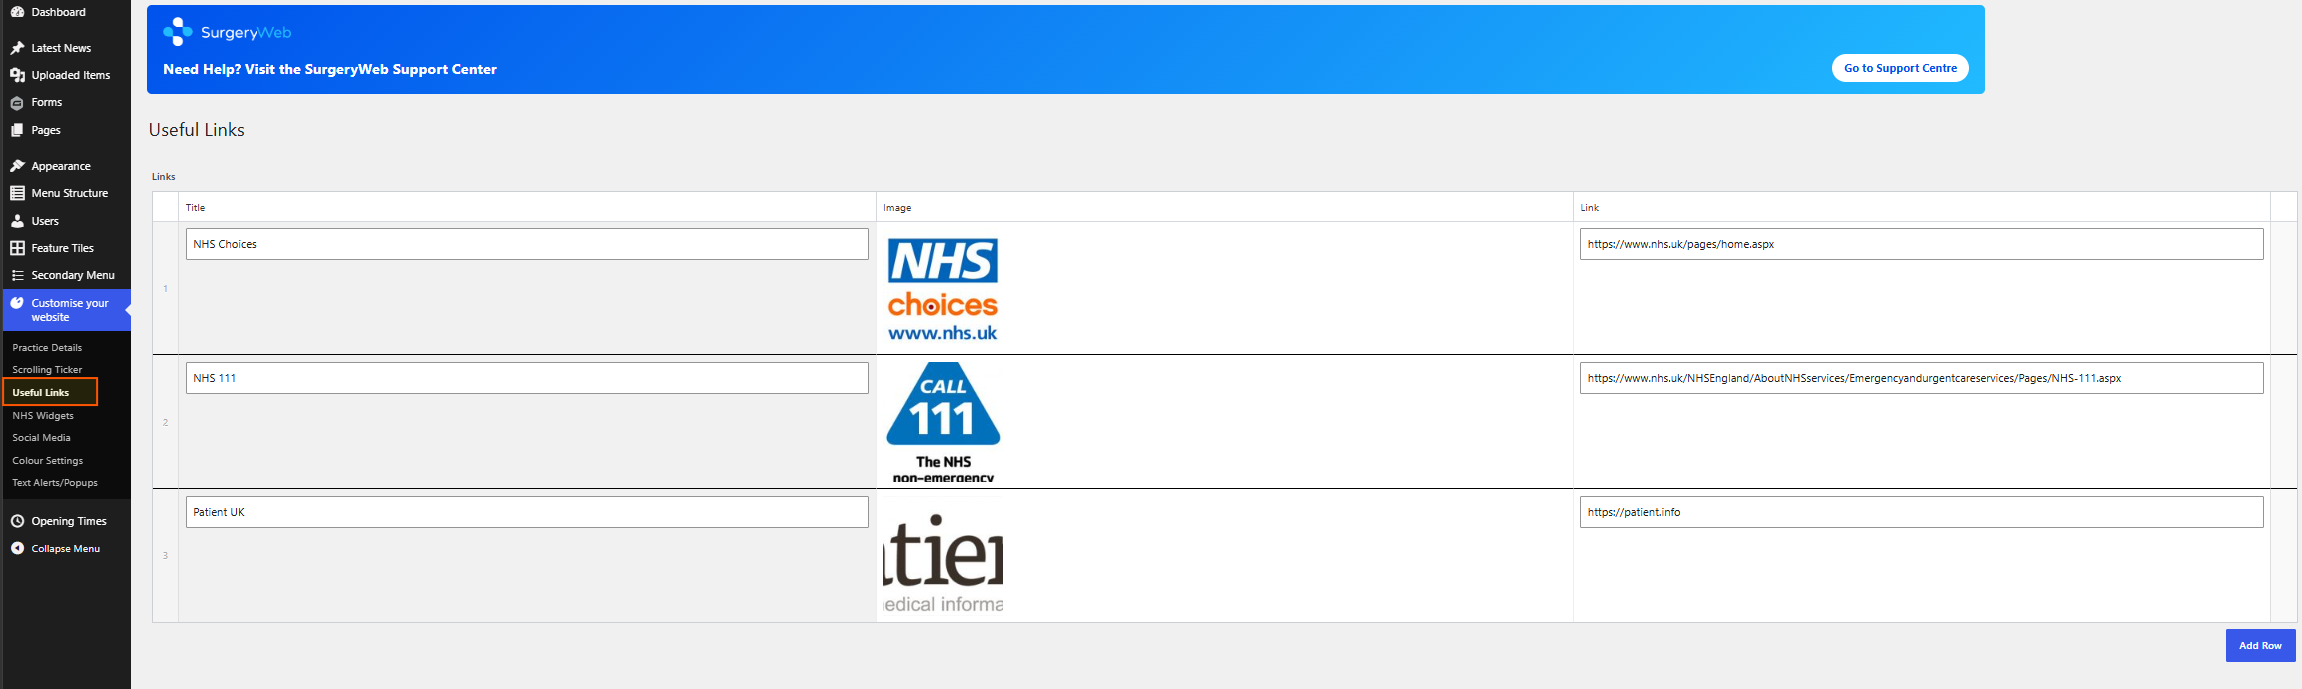
Update an existing link
- Go to Customise your website → Useful Links.
- Locate the link you wish to update.
- Amend the information in the relevant fields:
- Title – The name of the link.
- Image – The image associated with the link.
- Link – The website address (URL) visitors will be directed to.
- Click Update to save your changes.
Add a new link
- Click Add Row at the bottom of the links section.
- Enter the Title of the new link.
- Add an image, where required.
- Enter the full website address in the Link field.
- Click Update to save your changes.
Tip: Check that all website addresses are correct and that links direct visitors to the intended pages.
NHS Widgets
The NHS Widgets section allows you to control which NHS information widgets are displayed on your website.
Manage NHS Widgets
- Go to Customise your website → NHS Widgets.
- Review the available widgets:
- NHS A-Z Conditions Widget – Provides access to NHS information about health conditions.
- ‘Live Well’ Information Widget – Provides NHS health and lifestyle advice.
- Calculate your Heart Age – Provides access to the heart age calculator.
- Check your Blood Pressure Reading – Provides access to blood pressure information.
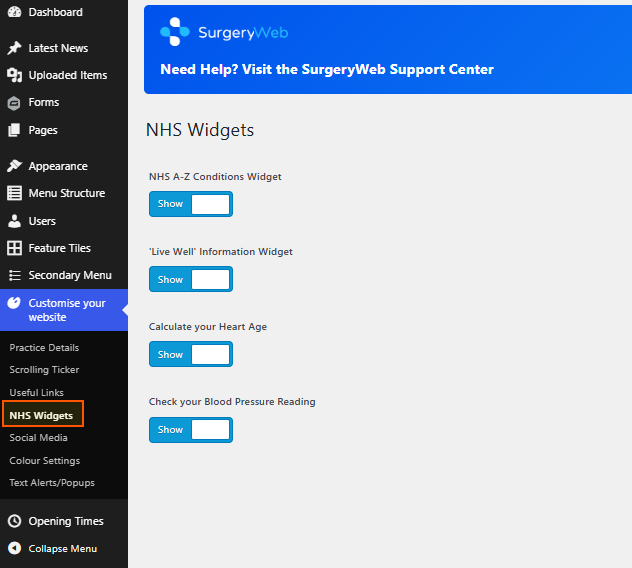
- Use the Show toggle next to each widget to control whether it is displayed.
- Click Update to save your changes.
Social Media
The Social Media section allows you to manage links to your practice’s social media accounts.
Add or update Social Media links
- Go to Customise your website → Social Media.
- Enter or update the full website address (URL) for the relevant social media account:
- Twitter URL
- Facebook URL
- LinkedIn URL
- Instagram URL
- Click Update to save your changes.
- Check that the social media icons on your website link to the correct accounts.
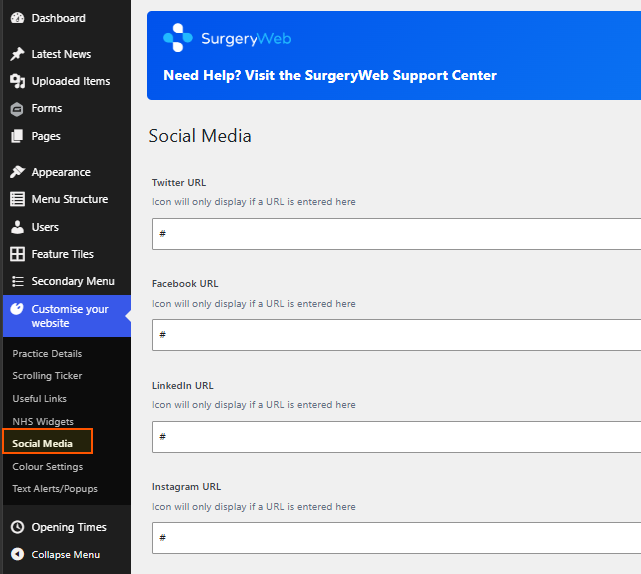
Important: A social media icon will only display if a URL has been entered in the corresponding field.
Colour Settings
The Colour Settings section allows you to customise the colours used throughout your website.
Change your website colours
- Go to Customise your website → Colour Settings.
- Locate the element you wish to customise.
- Click Select Colour next to the relevant setting.
- Choose your preferred colour.
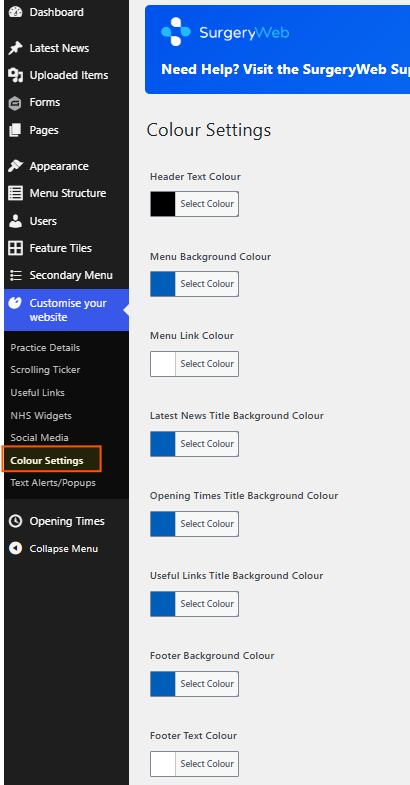
The following colour settings are available:
- Header Text Colour – Changes the colour of the header text.
- Menu Background Colour – Changes the background colour of the navigation menu.
- Menu Link Colour – Changes the colour of the navigation menu links.
- Latest News Title Background Colour – Changes the background colour of the Latest News title.
- Opening Times Title Background Colour – Changes the background colour of the Opening Times title.
- Useful Links Title Background Colour – Changes the background colour of the Useful Links title.
- Footer Background Colour – Changes the background colour of the website footer.
- Footer Text Colour – Changes the colour of the text within the footer.
- Click Update to save your changes.
- Check your live website to see how the selected colours appear.
Tip: Make sure there is sufficient contrast between text and background colours to keep your website accessible and easy to read.
Text Alerts/Popups
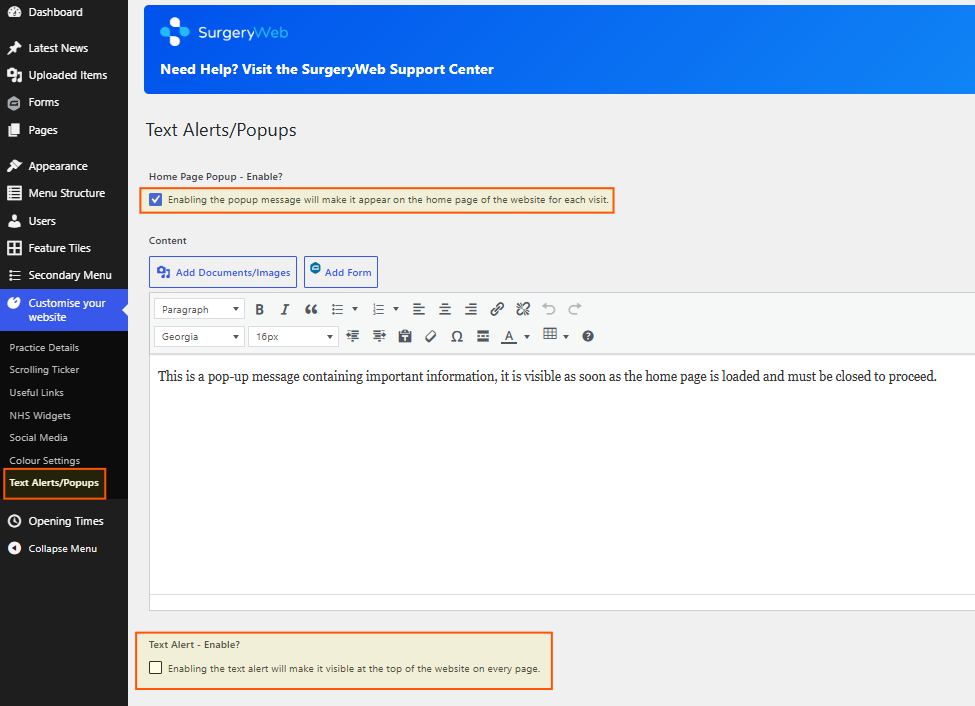
The Text Alerts/Popups section allows you to display important information to website visitors.
There are two types of messages available: Home Page Popup and Text Alert.
Home Page Popup
The Home Page Popup displays a message when someone visits your website’s home page. Visitors must close the popup before continuing.
To enable or update a popup:
- Go to Customise your website → Text Alerts/Popups.
- Under Home Page Popup – Enable?, tick the checkbox to enable the popup.
- In the Content editor, enter the message you wish to display.
- Use the formatting toolbar to adjust the text, add links or format the message.
- Use Add Documents/Images to include relevant documents or images if required.
- Use Add Form to insert a form if required.
- Click Update to save your changes.
To disable the popup:
- Untick Home Page Popup – Enable?.
- Click Update to save your changes.
Text Alert
The Text Alert displays a message at the top of your website on every page.
To enable or update a Text Alert:
- Go to Customise your website → Text Alerts/Popups.
- Locate Text Alert – Enable?.
- Tick the checkbox to enable the alert.
- Enter or update the alert message in the relevant content area.
- Click Update to save your changes.
To disable the Text Alert:
- Untick Text Alert – Enable?.
- Click Update to save your changes.
Tip: Text Alerts and Popups are useful for urgent announcements, temporary closures or important service updates. Remember to disable them when the information is no longer relevant.
Was this helpful? Give it a thumbs up!