
Sub-sections of Customise your Website
Practice Details
Practice Name – Whatever is entered here will appear in the top right of the header
Logo or Image – If you have a Practice logo, upload it in this field and it will appear to the left of the Practice Name in the header, it will automatically scale down to size.
Address – Your practice address should stay on one line and will appear underneath the Practice Name in the header.
Telephone – Your Practice telephone number will appear in the top right side of the header.
Fax – Your Practice Fax number will appear in the top right side of the header, underneath the telephone number.
Third line – You can optionally set a third line of content in the top right corner of the header and this can either be some text, an email address or a link to an external website (such as your CCG, Federation website or local hospital etc.)

Header
Top Bar – The top bar is simply the row of colour right at the top of the website, this is simply to break up white space but is not to everyones taste, so although enabled by default, you have the option to disable this by unticking the box. When enabled you will see a colour picker field below for you to select what colour you would like this strip to be.
Header Text Colour – This is the colour of the Practice name, address, telephone number and other details in the header.
NHS Logo – If enabled, the NHS logo will be displayed on the right side of the header, but some Practice may wish to remove this so can do by simply unticking the box.
Logo – By default, the NHS logo (when enabled) will show the NHS England logo but Practices in Scotland can change this setting to show the NHS Scotland logo instead.
Menu Background Colour – This is the colour of the background for the main site navigation, blue by default but can be changed to anything you prefer.
Menu Link Colour – This is the colour of the links within the main navigation menu, be careful not to select anything that may clash with the background rendering the text unreadable.

Coloured Tiles
Core Tiles
There are 7 core tiles within the website that are enabled by default (Update your details, Order your prescriptions, Patient Participation Group, Patient Survey, Download Practice Leaflet, Online Appointment Booking and Friends and Family Test). Each of these tiles either link to a) forms that load in a pop-up window for your patients to submit details to you, b) your Clinical Systems Online Services, c) to uploaded documents (Practice leaflet) or images, d) an internal news post or page on your website or e) an external website. You can customise the appearance of these tiles and their actions at any time.
You can either toggle the Enabled field to turn the tile on or off, the core tiles cannot be removed so if there is one that you wish not to use then just disable it. You can also ‘tidy’ the screen by hiding the options for each field when they’re not in use, by clicking the up arrow on the Show/Hide options field.
IMPORTANT – If you are customising your tiles, save the changes before hiding the options, e.g. change the background colour, save, then hide options and save again. If you don’t save after the change and hide your options, the new values won’t be saved.

When the Options are shown, you will see the following fields:
Background Colour – This colour picker is for the background colour of the tile.
Text Colour – This colour picker is for the colour of the tiles text.
Icon Colour – The core tile icons are available in black or white and we recommend that you also select black or white for the text to match, but if you prefer to have more colourful text that you have the option to do so.
Tile Action – As mentioned above, there are 5 possible actions for your tile. 1) External Website will give you a text field to copy/paste a web address in to and when the tile is clicked, this website will open in a new tab/window. 2) Display a pop-up form will give you a drop-down field for you to select what form you would like to display, patients can then submit information direct to the Practice via the form. 3) Page/Post on this website will give you a drop-down field you to select what existing page you would like to link the tile to, this saves the patient trying to find a link in the main navigation and can click your tile instead. If you would like to link a tile to a new page, the page must be created first for it to be available in this list. 4) Document/image will give you a file upload field so you can upload a document or image for patients to download, this is useful for your Practice Leaflet or an updated Newsletter or Practice Policy. 5) Online Services will give you a selection field where you must select what Clinical System you use, this will then link the tile to the respective Online Services home page for your system (i.e. Patient Access for Emis, Vision Online for InPS Vision etc..)
Last Field – This field type will change depending on what is selected for ‘Link Type’, see above.

You can also re-order the tiles, if you hover over the row number on the left hand side you will see the mouse cursor change to a crosshair type icon, click and drag the row up or down to re-order, this is easier to do when all settings are ‘collapsed’.

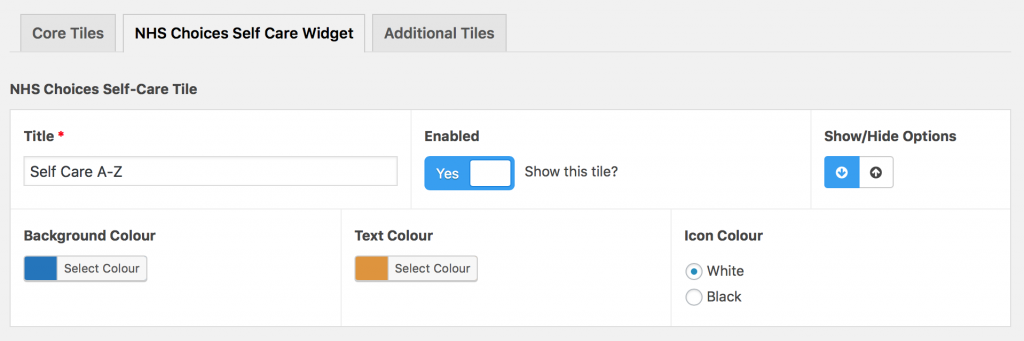
NHS Choices Self Care Widget
The NHS Choices Self Care Widget works in the same way as the Core Tiles above, whereby you can enable/disable the tile, show/hide the options, and when they are shown you will see the option to change the Background Colour, Text Colour and Icon Colour. There is no option to change the action of the form because the action is already set to load the NHS Choices A-Z Conditions widget in a pop-up window.
IMPORTANT – If you are customising your tiles, save the changes before hiding the options, e.g. change the background colour, save, then hide options and save again. If you don’t save after the change and hide your options, the new values won’t be saved.
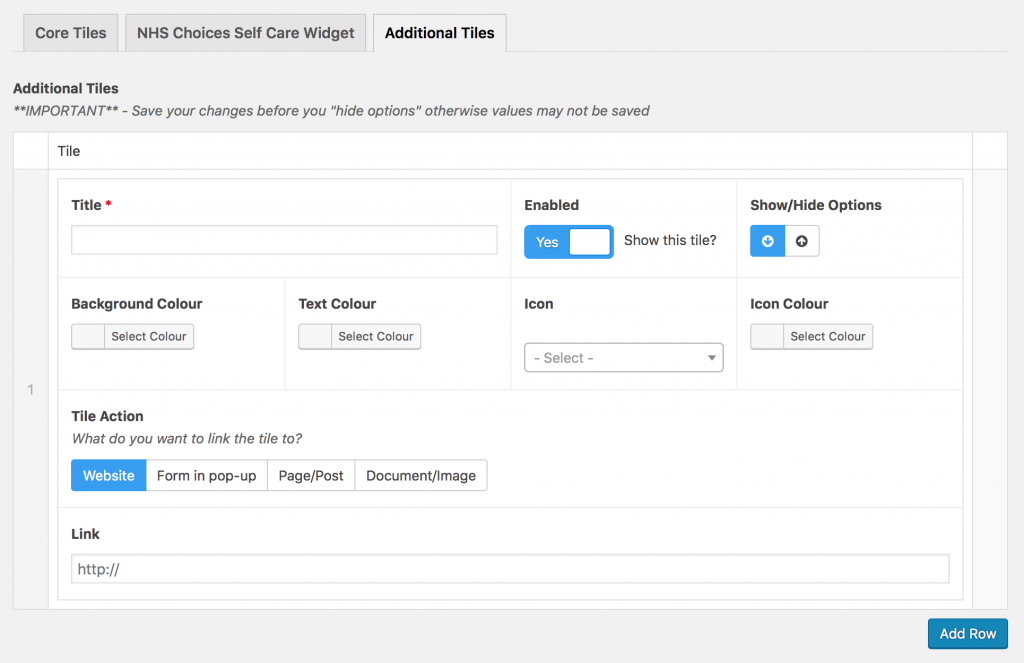
Additional Tiles
These work in the same way as the Core Tiles above and there is no limit as to how many additional tiles you can create. We encourage Practices to look at other SurgeryWeb users to gather ideas for what tiles can link to and you can find the web links to other SurgeryWeb users on the Client Map.
The only difference with the Additional Tiles is that you can select your icon and there are many to choose from.
IMPORTANT – If you are customising your tiles, save the changes before hiding the options, e.g. change the background colour, save, then hide options and save again. If you don’t save after the change and hide your options, the new values won’t be saved.
Useful Links
You can provide links to your patients for useful resources such as NHS Choices or NHS 111, and these appear on the right hand side of all pages, underneath the coloured tiles.
To add a link, click the ‘Add row’ button, give your link a title (and this will be displayed if no image is uploaded), upload an image (we recommend that you save the logo from the resources own website to use here) and then copy/paste the web address.
Depending on the size of the image that you have uploaded, you can alter the size of the link, longer images will require a 100{5a4a782ff35b28366a50638dc3d3796d72d97a486618cdcdde7184d374e13a42} width (meaning that the image will take up 100{5a4a782ff35b28366a50638dc3d3796d72d97a486618cdcdde7184d374e13a42} of the ‘Useful Links’ section on the website) but images that are more square in proportion can be set to 50{5a4a782ff35b28366a50638dc3d3796d72d97a486618cdcdde7184d374e13a42} and this will fit 2 images side by side comfortably.
You can also change the background colour of the “Useful Links” title, default is blue.

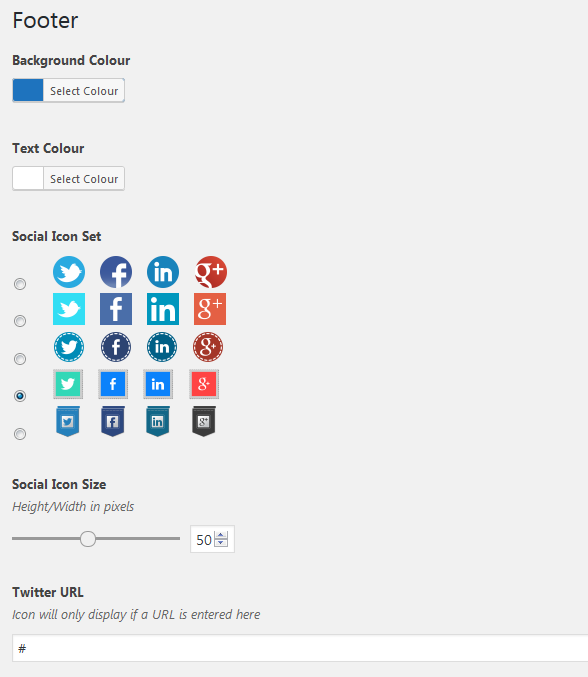
Footer
Background Colour – This colour picker will set the main colour of the footer background, default is blue.
Text Colour – This colour picker will set the text colour for the links in the footer navigation and also the ‘Staff login’ link, be careful not to pick anything that may clash with the background colour.
Social Icon Set – If you have Social Media channels that you want to display links for, you can choose a set of icons to use from 5 options.
Social Icon Size – If using the Social icons as above, you can select what size you want the icons to display, the slider ranges between 32 pixels (small) and 72 pixels (large).
Twitter/Facebook/LinkedIn/Google+ URL – Enter the web addresses for each of your Social channels, the respective icon will display if something is entered in to each field, if not using these then leave them blank and the icons will not display.
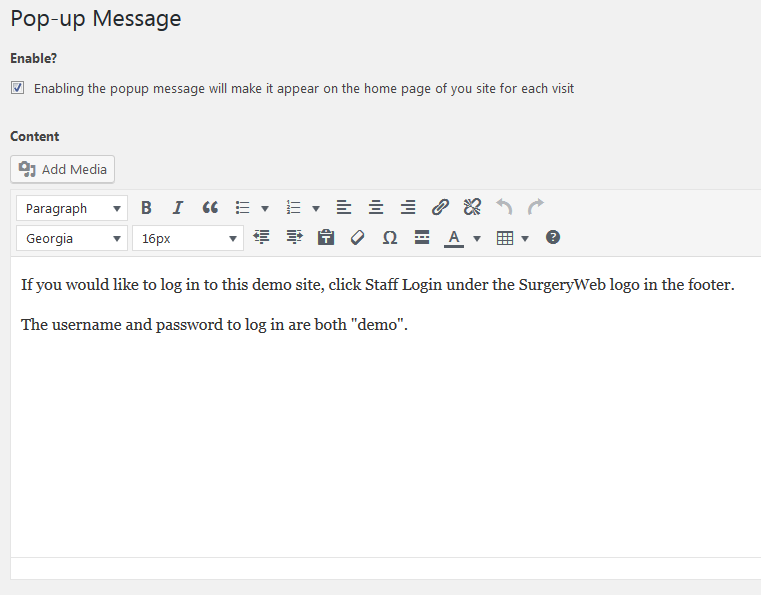
Pop-up Message
If you would like to display a pop-up alert on your websites front page to notify patients of important updates e.g. phone lines are down, closed for training etc.. then simply enable the pop-up message and write your alert content in the editor.
This will display each time a visitor opens the front page of your website.
 Top
Top